Table of Contents
If you are having problems or have questions contact a club member using this email address: info@coconinoastro.org
CAS Online Meetings Using Skype
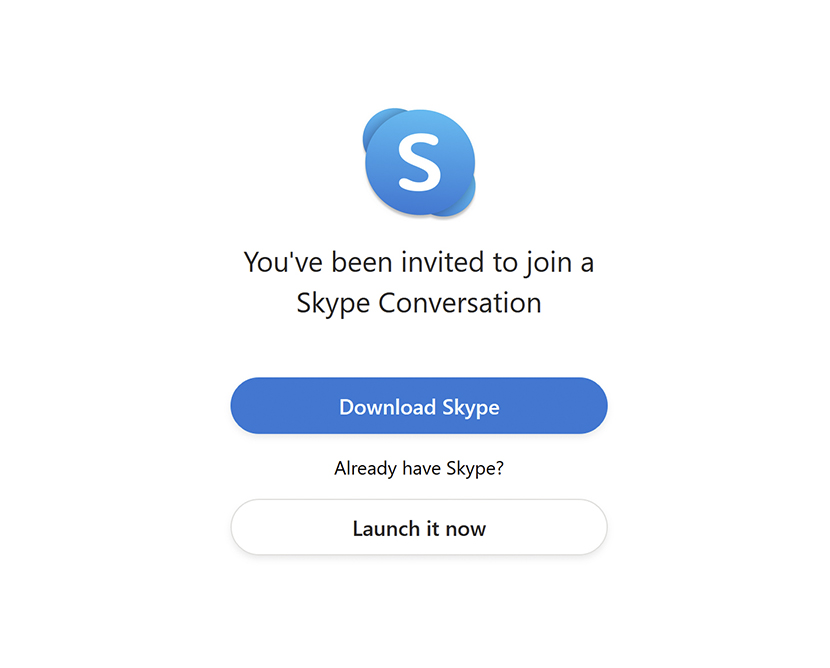
This page provides information for using Skype for online CAS meetings. In a meeting email notice a link is provided for joining a meeeting. This link is the same for all meetings and can be bookmarked in your browser.
To join the meeting you must have Skype loaded on your computer or cellphone. You can either create an account with Skype or sign-in as a guest.
Although you can do without it a microphone is recommended. Without a microphone you only option to interact with the group is the chat feature. A camera is recommended but not necessary.
Starting a Meeting
To start the meeting click on the html link in the email or copy and paste it into the browser.
If you are on a Mac you may see slightly different screens
Browser Menu
Next this screen appears. Simply press Open Link.
You may bookmark this link for future meetings.
Sign In
The next screen is to sign in under an existing account or as a guest. If you have Skype open you will not see this screen
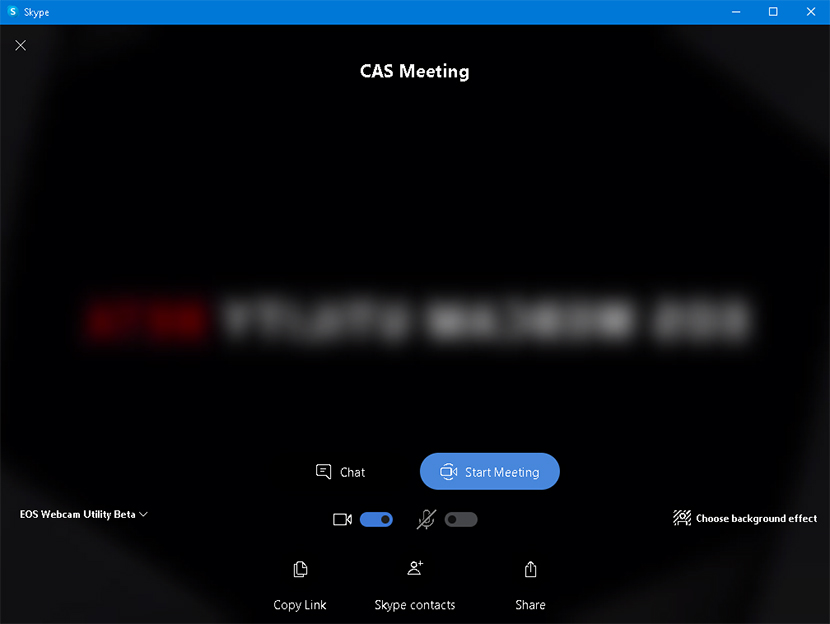
Join Call
Note the two icons for the camera and micrhophone. Normally the microphone is mutted. To speak you must unmute it. You can also mute the camera if you have one. You can change these default options under the Setup Menu
The chat icon allows you to send text messages to the other participants.
To start the meeting press the Blue Start Meeting button.
Top
Main Screen

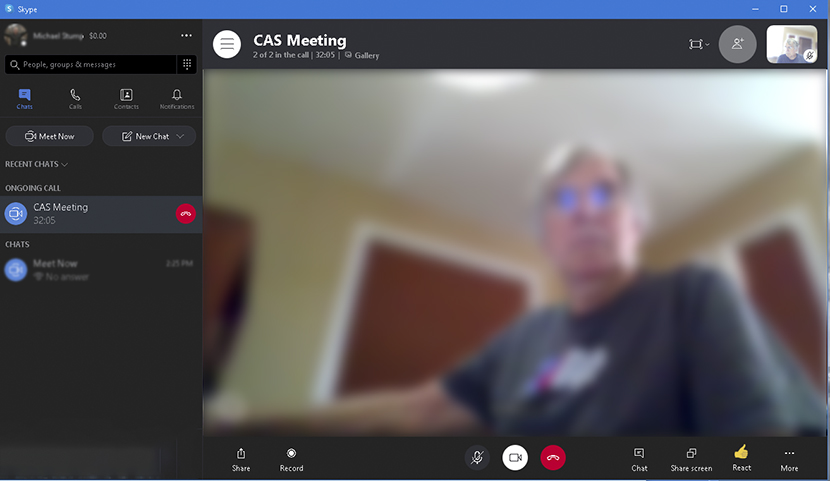
Once you join the call you see this screen.
At the top right of the screen is a rectangular icon drop down menu.
Pressing on this icon brings up a menu with optons for entering or exiting full-screen. Depending on your computer configuraton there may be more or fewer options.
At the bottom of the screen are a number of icons. Left to right they are:
- Share - Various options to invite someone to the meeting
- Record
Skype allows recording of a meeting. Once the button is pressed a menu appears and an anouncement is displayed to all participants that the meeting is being recorded. The recorded meeting can later be downloaded to a MP4 file.
- Microphone Mute button
- Camera Mute Button
- Hang Up Button
- Chat
This allows a user to send a text message to communicate without interfering with the main meeting. The message is sent to all participants.
- Share Screen Menu
Pressing this button brings up a menu to share your screen. Anyone can share their screen.
- React Button
Bunch of emoticons for fun
- ... More
Options to enter Setup or change background options
Under Setup you can select "Audio & Video" to configure your microphone and camera
Top
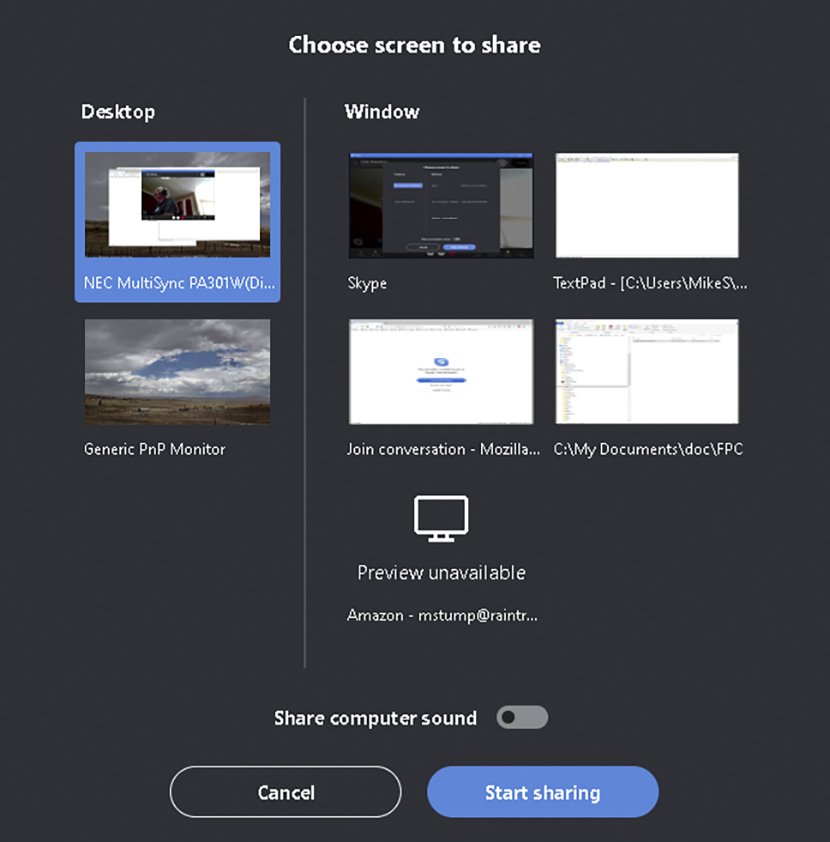
Sharing your Screen
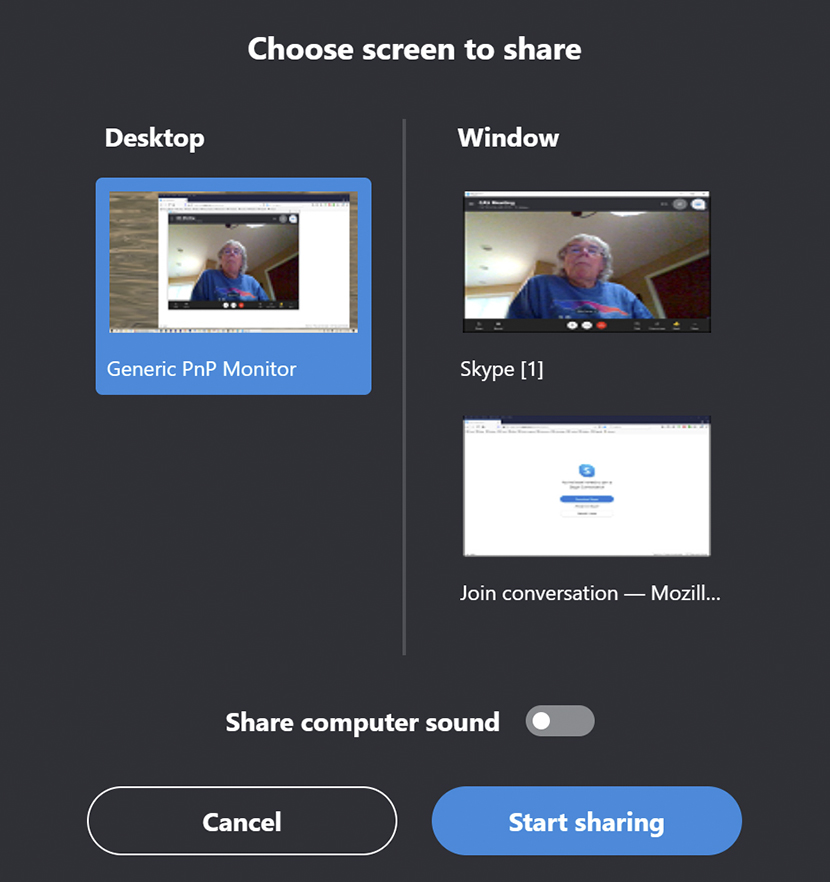
Press the Share Screen icon at the bottom of the screen to bring up this menu.
The upper image on the left is for a computer or laptop or PC with only a single screen.
The lower image is an example for a computer with two screens
You can either share your desktop or a single application. It is recommended that you share your desktop but make sure you don't have anything showing on your desktop you don't want the world to see.
Click on one of the icons uder "Desktop" to display your desktop or one of the applications o nthe right to open a application.
The "Window" options allows you to share a single application.
Select the 'Share Computer Sound' at the bottom of the screen.
For doing a PowerPoint presentation
- When the share screen is shown select Desktop, not Window
- Open your PowerPoint presentation
- Select 'Slide Show Option'
- Select 'From Beginning'
Top
Troubleshooting
Skype Microphone, Camera, and Speaker Check
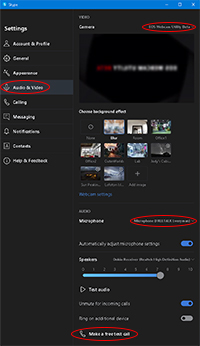
Perform the fofllowing test of your microphone and speaker.
- Connect your camera and microphone
- Open Skype
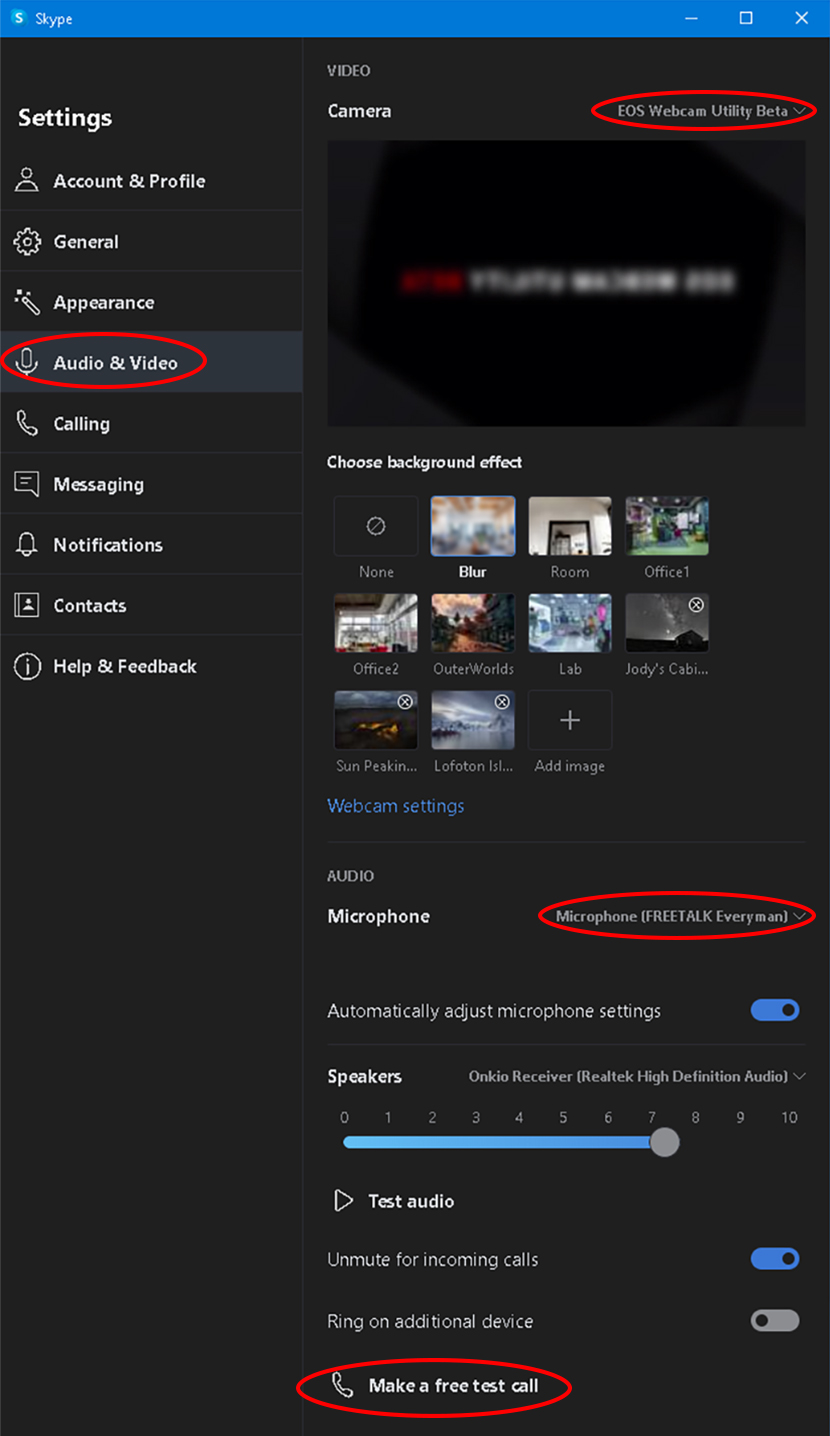
- Press Ctrl-comma to open the Skype Settings pop-up
- From the list on the left select "Audio & Video"
At the top of the "Audio & Video" screen you should see the output of your camera.
To the right of the text "Camera" the selected camera is displayed. There is a drop down list to change the selection.
On the same "audio & Video" screen scroll down to the Microphone section. To the right of the "Microphone" text there is another pull down menu to select the microphone. Make sure the correct one is selected.
If you speak into our microphone you should see a horizonal row of blue dots changing as your volume changes. If you don't see this then your microphone is not working.
Press the "Test audio" button to verify your speakers are working. Although not highlighted in the photo there is a pull down menu to select your speakers.
At the bottom of the pop-up menu is a "Make a free test call". You may use this to verify your speaker and microphone are working. I believe this does not work if you are logged on as Guest.
Windows 10 Check Microphone Sound Level
Do this check if you cannot get any sound out of your microphone. The level setting discussed below seems to default to zero on Windows.
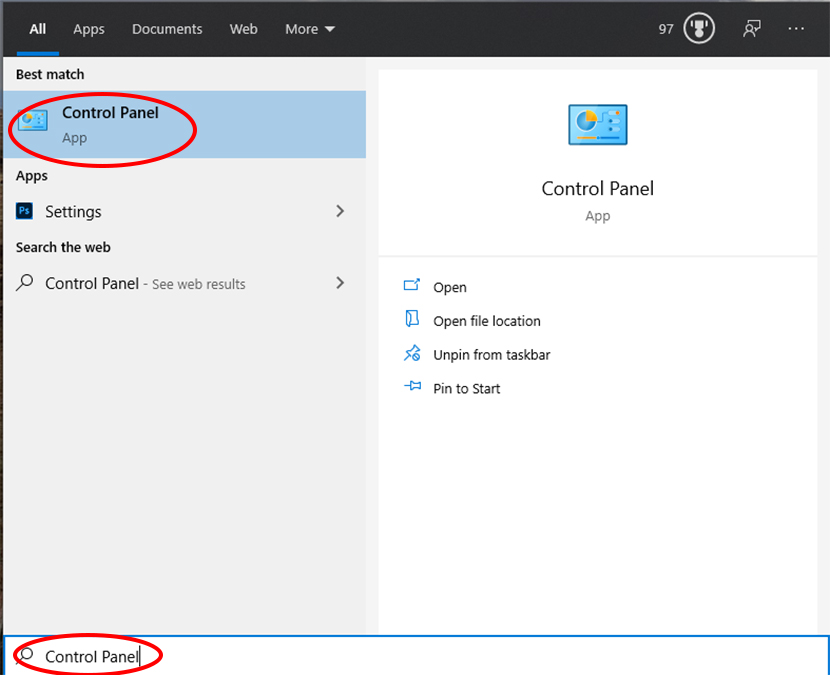
- Use the Windows 10 Search by clicking on the magnifying glass icon on the toolbar or right-click on the Start Icon and select Search.
- Type in "Control Panel" and then select the "Control Panel App" shown in the image at the left.
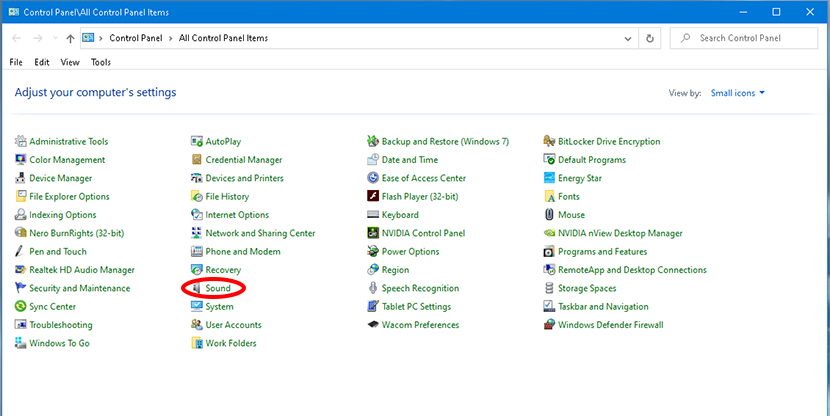
- From the Control Panel pop-up click on the Sound Icon
- From the Sound pop-up select Recording, click on your microphone, and then the Properties button at the bottom right
- From the Microphone Properties pop-up select Level
- Make sure the level is set to a non-zero level
Top